

Key takeaways
- Best Christmas Light Projectors for Outdoor Displays The best Christmas light projectors for outdoor displays are weather-resistant LED or laser units with a coverage area matched to your yard, a built-in timer, a stable ground stake, and enough brightness to…
Best Christmas Light Projectors for Outdoor Displays
The best Christmas light projectors for outdoor displays are weather-resistant LED or laser units with a coverage area matched to your yard, a built-in timer, a stable ground stake, and enough brightness to remain visible against nearby porch and street lighting.
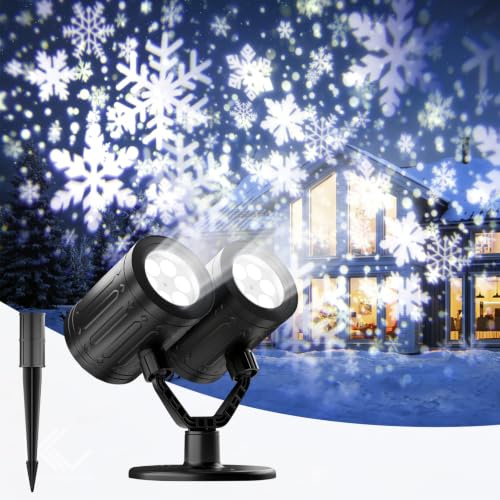
For most homes, a rotating LED projector rated for approximately 500 to 1,000 square feet offers the best balance of price, safety, and coverage. Choose a brighter laser projector for a large façade or trees, a compact LED model for a small front garden, and a multi-head or moving-effects projector when you want several patterns from one installation.
Our top picks



As an Amazon Associate we earn from qualifying purchases at no extra cost to you. Ratings are shown as listed on Amazon.
Quick Picks by Yard and Use Case
| Situation | Best projector type | Recommended coverage | Why it fits |
|---|---|---|---|
| Small yard, balcony, or townhouse frontage | Compact LED pattern projector | 200–500 sq. ft. | Lower brightness, smaller mounting footprint, and less risk of lighting neighboring windows |
| Typical detached-home façade | Rotating LED snowflake or holiday-pattern projector | 500–1,000 sq. ft. | Good coverage without requiring multiple units |
| Large house, tall trees, or deep front yard | High-output laser projector or dual-head LED unit | 1,000–2,000 sq. ft. | Maintains contrast over longer distances and uneven surfaces |
| Frequent seasonal setup | Sealed outdoor projector with timer memory | Any suitable size | Reduces daily adjustment and tolerates repeated installation |
| First-time decorator on a limited budget | Basic LED projector with stake and indoor controller | 300–800 sq. ft. | Simple controls and relatively low replacement cost |
What to Compare Before Buying
Projection coverage and throw distance
Coverage figures are meaningful only when considered with throw distance. A projector may cover 800 square feet at 20 feet, but produce a much smaller, brighter image at 10 feet. Check both the stated coverage and the recommended distance from the target surface.
As a practical estimate, measure the width and height of the area you want to illuminate, then calculate:
Approximate area = façade width × illuminated height.
For example, a 30-foot-wide façade with a 12-foot illuminated section represents about 360 square feet. A projector rated for 500 square feet gives useful headroom for pattern falloff, shrubs, and uneven siding. If the projector is placed 25 feet away and the beam spreads across 30 feet, moving it to 15 feet will usually make the pattern brighter but narrower.
Brightness and pattern contrast
Brightness matters most when the display faces streetlights, neighboring floodlights, or reflective snow. LED projectors are generally sufficient for a small or moderately lit yard. Laser projectors often produce sharper, more saturated points and remain easier to see across large areas, but they need more careful placement because concentrated beams can be distracting.
Look for adjustable speed, separate color controls, and patterns with strong contrast. A white snowflake effect may disappear against light siding, while red, green, or multicolor patterns are easier to distinguish. Avoid assuming that a higher advertised wattage automatically means a better image; optics, beam spread, and pattern density also affect visibility.
Weather resistance
For outdoor use, select a unit with an IP rating rather than relying only on the words “weatherproof” or “outdoor.” IP44 protects against water splashes and may be adequate under a covered porch. IP65 provides stronger protection against dust and water jets and is a better target for an exposed lawn installation.
The projector head, power adapter, controller, and cable should all be suitable for the intended location. A weather-resistant projector can still fail if its power brick sits in a puddle or its connector faces upward and collects water. Use an outdoor-rated extension cord and keep every connection elevated inside a weatherproof connection cover.
Timer and control options
A timer is one of the most useful features because continuous operation wastes electricity and shortens the service life of moving parts. Common schedules include six hours on and 18 hours off, eight hours on and 16 hours off, or a simple fixed daily timer.
Some models use a physical button or remote control, while others add radio-frequency control or an app. Physical controls are usually more dependable in cold weather. App-based controls can be useful when the projector is mounted out of reach, but confirm that the unit retains its schedule after a power interruption.
Mounting and adjustment
A ground stake works well in soil, mulch, and turf, but it can become loose after heavy rain or frost. A weighted base is better for patios and hard surfaces. Wall brackets provide the most consistent alignment, although they require drilling and may place the projector where snow or runoff reaches it.
Choose a projector with a tilting head and a stake long enough to remain stable—roughly 8 to 12 inches is common for lightweight units. For windy locations, a dual mounting system is worthwhile: push the stake firmly into the ground and secure the cable separately so the cable cannot pull the projector sideways.
Head-to-Head: LED Versus Laser Christmas Projectors
| Feature | LED projector | Laser projector |
|---|---|---|
| Typical coverage | 200–1,000 sq. ft. | 500–2,000+ sq. ft. |
| Pattern appearance | Softer images and broader color washes | Sharper points and higher apparent contrast |
| Best placement | Close to a wall, porch, shrubs, or small façade | Longer throw distances and large façades |
| Typical power draw | 5–15 watts | 5–20 watts |
| Common weakness | May look washed out under bright ambient lighting | Needs careful aiming and responsible beam placement |
| Maintenance concern | Moving lens or fan, if fitted | Lens alignment, fan, and moving pattern mechanism |
LED is the safer default when you want broad patterns close to the house. Laser is attractive for large displays, but never aim a projector toward roads, neighboring homes, aircraft, or places where people may look directly into the beam. Follow the manufacturer’s safety instructions and any local aviation or outdoor-lighting rules.
How Much Electricity Will It Use?
Christmas projectors usually consume less electricity than strings of incandescent lights. A 10-watt projector running for six hours each night over 45 days uses:
10 watts × 6 hours × 45 days = 2,700 watt-hours, or 2.7 kilowatt-hours.
At an electricity rate of $0.20 per kilowatt-hour, that is about $0.54 for the season. A 20-watt unit under the same schedule would use 5.4 kilowatt-hours, costing approximately $1.08. Your actual cost depends on the local utility rate and the projector’s measured consumption, but the timer has a larger effect on usage than small differences between efficient LED models.
Installation Steps That Improve the Display
- Measure the target area. Include the façade, trees, garage door, or shrubs you actually want illuminated rather than the entire property.
- Start closer than the maximum distance. Position the projector about 8 to 15 feet from a small façade, then move it back until the pattern fills the area without becoming too dim.
- Level the projector. A tilted stake causes the upper part of the display to stretch while the lower part becomes crowded.
- Secure the cable separately. Leave a small drip loop before the connector so rain runs off instead of traveling toward the power connection.
- Set the timer after alignment. Run the projector for several minutes in darkness and check visibility from the street before finalizing the schedule.
- Recheck after bad weather. Wind, frost, and saturated soil can change the beam angle even when the projector remains powered.
Durability and Ownership Realities
The parts most likely to wear first are the cooling fan, rotating pattern wheel, weather seals, and cable connections. Dust or insects around a fan can increase noise and heat. Wipe the lens with a soft, dry microfiber cloth before storage and after installation; abrasive cleaners can damage coatings and blur the image.
Do not store the unit outdoors through the off-season unless the manufacturer specifically permits it. Disconnect power before moving or cleaning the projector, allow it to dry fully, and keep the original stake and controller together in a labeled container. Avoid wrapping the cable tightly around the projector because repeated sharp bends can damage the insulation near the housing.
For most buyers, a sealed IP65 LED projector with a six- or eight-hour timer, a tilting head, and both stake and flat-base mounting offers the best overall choice. Choose a laser model when the display must cross a large yard or remain visible against strong ambient light; choose a compact LED unit when the goal is simple, close-range decoration with minimal aiming and maintenance.







Write Your Review
No reviews yet. Be the first to share your experience!