

Key takeaways
- For most users who retain meaningful leg strength, prioritize a stand assist device with a generous capacity margin, adjustable handles, a footprint that fits the transfer space, and a stable base that can be locked before rising. Choose portability only when it will be used;…
Best Stand Assist Devices for Safer Transfers
The best stand assist device is the one whose weight capacity, handle height, base width, and stability match the user and the exact transfer area—not simply the model with the lowest price or the highest stated capacity.
For a person who can bear some weight through their legs and follow instructions, a stable sit-to-stand aid with padded handles is often the most practical choice. A transfer pole suits a narrow space when the user can pull upward safely. A floor-to-ceiling support pole can provide a useful handhold beside a bed or chair, while a powered sit-to-stand lift is more appropriate when the user cannot rise reliably without substantial assistance. None of these devices should be treated as a substitute for an individualized assessment by a physical or occupational therapist.
Our top picks


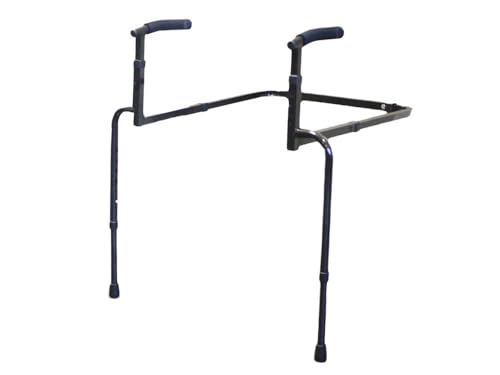
As an Amazon Associate we earn from qualifying purchases at no extra cost to you. Ratings are shown as listed on Amazon.
Quick comparison by transfer situation
| Situation | Most suitable device type | Important specification | Usually a poor match |
|---|---|---|---|
| User can push through both legs and follow directions | Fixed or wheeled sit-to-stand aid | Non-slip base, multiple handle positions, 300–400 lb rated capacity | A device that requires the user to pull with the arms alone |
| Small bedroom or bathroom with little floor space | Transfer pole or narrow stationary support | Base or footprint under about 20 inches wide; secure floor and ceiling contact | A wide rolling aid that cannot be positioned beside the chair |
| Occasional use in more than one room | Foldable stand assist frame | Folded depth under 8 inches and a practical carry weight of about 15–25 lb | A permanently assembled lift weighing 50 lb or more |
| User cannot consistently bear weight or control the knees | Powered or caregiver-operated lift assessed by a professional | Harness compatibility, emergency lowering, and a capacity exceeding the user’s weight | A basic handle aid or transfer pole used as a lifting machine |
What to compare before buying
Weight limits: leave a margin
Manufacturers state a maximum user weight, but that figure is not a recommendation to operate at the limit. Measure the user’s current weight with clothing and consider a device rated at least 50–75 lb above it. For example, a 235 lb user should generally prompt a search for a model rated around 300 lb or more, subject to the manufacturer’s instructions and professional advice.
Capacity also depends on how force is applied. A user leaning sharply to one side, pulling forward on a tall handle, or twisting during a pivot can place more stress on the frame than a centered, controlled rise. Check whether the stated limit applies to the complete device, including a seat, sling, or accessory.
Handle height and grip design
Handles should allow the user to begin with the hands near the armrests or upper thighs, then maintain a comfortable grip while rising. A handle that is too low encourages excessive bending; one that is too high can encourage pulling the body forward and tipping the aid.
Look for several height positions, rounded edges, and a grip diameter that the user can fully close their hand around. Foam padding may improve comfort but can wear or tear sooner than molded rubber. On a wheeled aid, handles should be symmetrical and positioned so the user does not have to reach behind the body.
Do not assume that a taller handle is better for a taller person. Measure from the floor to the user’s hand position while seated, and compare that measurement with the adjustment range. Leave enough clearance for armrests, clothing, and the user’s knees.
Base width and the actual clearance
Base width is a stability feature and a fit problem at the same time. A wider footprint usually resists tipping, but it may not fit between a toilet and vanity or around a kitchen chair. Measure the narrowest passage, not just the open area in front of the furniture.
As a practical example, if the usable gap beside a chair is 25 inches and a device’s base is 23 inches wide, only 1 inch remains on each side. That leaves little room for positioning errors, flooring irregularities, or the user’s feet. A device around 18–20 inches wide may fit more comfortably, but it must still provide adequate stability for the user and caregiver.
For rolling models, check whether the legs or wheels can approach the chair without striking the footrest. A device that fits only when the chair is pulled away from the wall may be unsuitable for daily use.
Stability: more than a wide frame
Stable stand assist devices generally have a low center of gravity, a broad base, non-skid feet or lockable casters, and handles that do not flex under load. On a wheeled model, brakes should be easy for the caregiver to reach and should lock the appropriate wheels before the user begins to rise.
Test stability without placing a person in danger: on a clear floor, apply moderate downward and sideways pressure to the handles and inspect for rocking, sliding, or frame flex. Never use a transfer aid on a loose rug, wet tile, or an uneven threshold unless its instructions specifically permit it.
Portability and assembly trade-offs
Foldable devices are useful for travel, storage, and moving between a bedroom and a living area. Their disadvantages can include more joints, a slightly narrower base, and the possibility of an incompletely locked folding mechanism. A compact design is only helpful if one person can lift it safely and unfold it without pinching fingers.
Before buying, look for the assembled weight, folded dimensions, and whether the device can fit through the home’s narrowest doorway. A 22 lb frame may be manageable for one caregiver, while a 45 lb unit may require two people even if it technically folds.
Assembly should normally involve checking every bolt, pin, caster, and height adjustment before first use. Keep the instructions, because replacement hardware and adjustment limits are difficult to identify later. If a frame arrives with a bent tube, missing locking pin, damaged weld, or caster that does not lock, do not improvise a repair.
Decision matrix for choosing the right type
| Priority | Best direction | Target characteristics | Trade-off |
|---|---|---|---|
| Lowest initial cost | Stationary frame or simple transfer pole | About $80–$250; minimal moving parts; fixed support point | Less flexible and not suitable for every user |
| Frequent daily transfers | Heavy-duty sit-to-stand aid | 300–450 lb capacity, lockable casters, replaceable pads | Higher cost and more floor space |
| Several rooms or occasional travel | Folding stand assist frame | 15–25 lb, folded depth under 8 inches, tool-free height adjustment | May sacrifice some rigidity or base width |
| Maximum caregiver assistance | Powered sit-to-stand lift | Emergency lowering, battery indicator, appropriate sling options | Often $1,000–$3,000 or more and needs charging and training |
Setup and use: a safer sequence
- Prepare the route. Remove mats, footstools, cords, and clutter. Ensure the destination chair or wheelchair is stable, with brakes applied where applicable.
- Set the height. Adjust the handles so the user can grip without shrugging, reaching behind, or leaning excessively forward.
- Position the feet. The user’s feet should be on a firm, dry surface, with the device close enough that the rising motion remains controlled.
- Lock or stabilize the device. Engage caster brakes and verify that the frame is fully opened and all adjustment pins are seated.
- Use a clear cue. Ask the user to lean forward as instructed by their clinician, push from the chair’s armrests if permitted, and rise on a count. Do not have them pull suddenly on the device.
- Pause before pivoting. Once standing, allow balance to settle. Turn with small steps rather than twisting while the feet remain planted.
A caregiver should not lift most of the user’s body weight with their back. If the user begins to slide, buckle, become confused, or cannot follow the sequence, stop and use the emergency plan recommended by a professional.
Ownership realities: what wears first
Rubber feet, caster brakes, swivel joints, grip covers, and folding locks typically deserve the closest inspection. Dirt and hair can reduce caster performance; moisture can make rubber tips slide; repeated over-tightening can damage adjustment holes. Wipe hard surfaces with mild soap and water, dry them fully, and follow the manufacturer’s instructions for disinfectants. Avoid soaking bearings or applying oil where it could reach a brake or floor-contact pad.
Before each use, look for loose fasteners, cracks, bent tubing, split padding, missing pins, and uneven contact with the floor. A device used several times every day may need more frequent checks than one used weekly. Replace worn parts with approved components rather than mixing generic casters or bolts that alter the device’s height or stability.
Bottom line
For most users who retain meaningful leg strength, prioritize a stand assist device with a generous capacity margin, adjustable handles, a footprint that fits the transfer space, and a stable base that can be locked before rising. Choose portability only when it will be used; otherwise, a heavier, wider frame may offer a better ownership experience. When the user cannot bear weight reliably, the safest choice is not a more powerful handle aid but a properly selected lift and instruction from a qualified healthcare professional.








Write Your Review
No reviews yet. Be the first to share your experience!